MH370 Flight Simulation of
Path Offset Scenarios
Geoff Hyman
2015 May 10
Updated May 12
1. Background and Summary
This note seeks to contribute to a continuing investigation (references [1], [2], [3]) of scenarios describing the period between last radar contact of MH370 and its final descent. The simulations were conducted using variant BSMv7-10-5_GH of a flight model by Barry Martin which may be downloaded by clicking here or here (warning: the download is 20.9 MB; for further information on Barry Martin’s MH370 flight models, see this webpage and this post and also this post and indeed this post too).
The scope of the model employed is sufficient to include a path offset near NILAM, associated with an increase in altitude, as well the final major turn (FMT). All turns are specified in terms of circular arcs with constant rates of turn. The increase in altitude is specified to be at a constant rate of climb (RoC). The program supports a temporal resolution of 15 seconds, proximity calculations of flight paths from designated waypoints, outputs relating to turn characteristics, plus a range of error criteria which may be used either to compare the statistical fit of alternative flightpath or to estimate selected unknown flight parameters.
The principal finding from the current investigation is that the most probable scenario is an offset path during the late middle game which did not continue beyond the FMT. Implications in terms of human and system factors are discussed.
The implied zero altitude locations from all of the tests are close to the published nominal IG September 2014 location [4], given as 37.5S, 89.2E. This report does not deal with estimated endpoint coordinates, as this requires a more detailed simulation of the final descent [5].
2. Initial Conditions, Key Outputs and Estimates
Table 1a shows the major input assumptions and principal model outputs. The second column in Table 1a, labelled ‘type’, adopts the abbreviations:
I: Input values/initial conditions
O: Values computed explicitly from the flightpath model
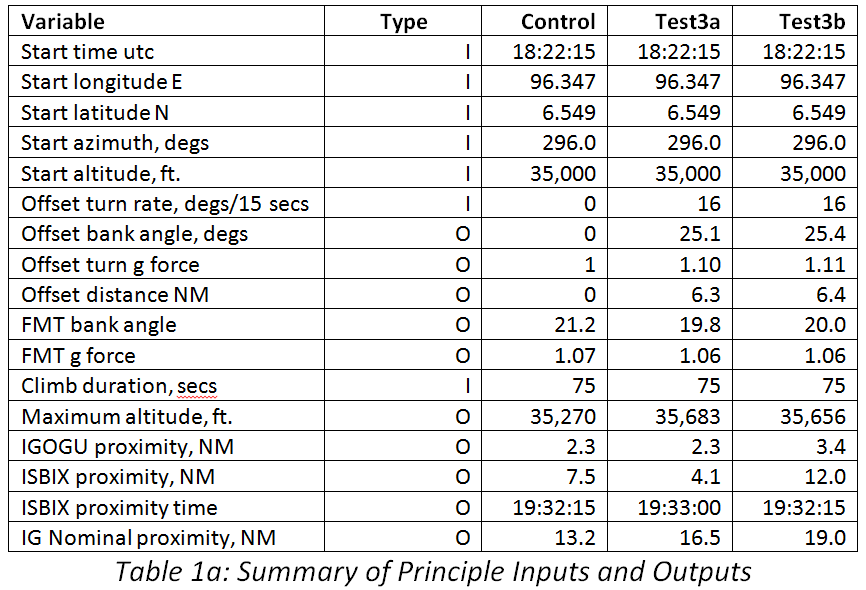
For some of the variables, values were estimated by minimisation of an error cost function (CF), using an approach which varied between the modelled scenarios, as specified in Table 1b.
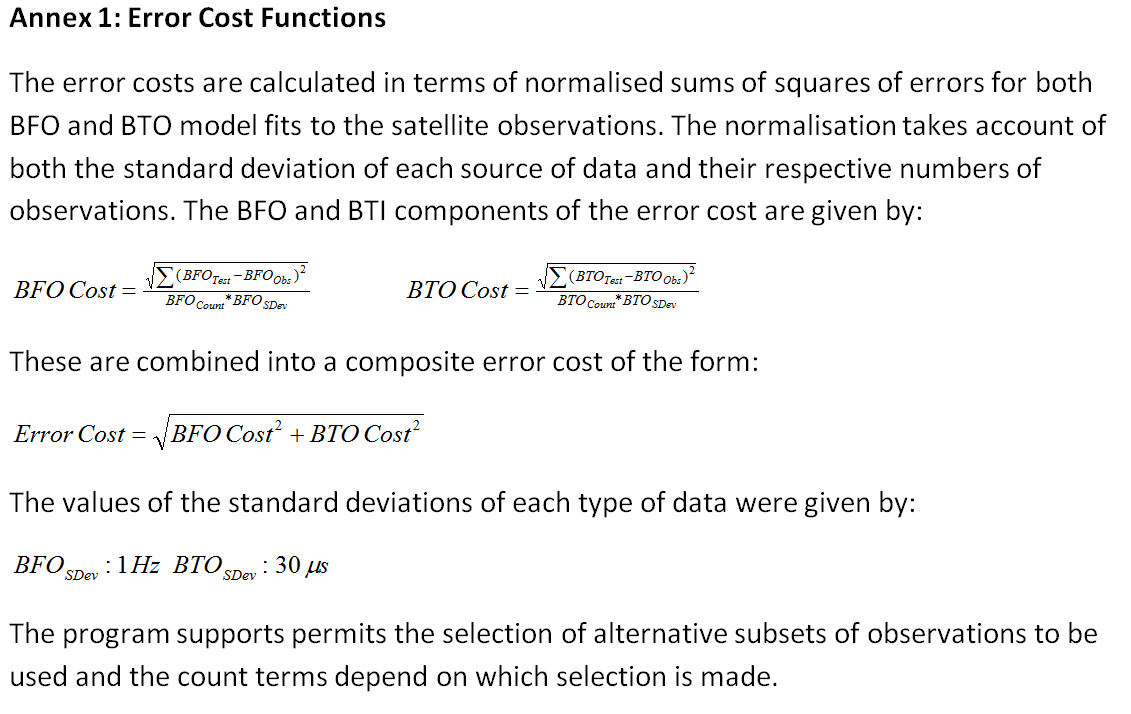
The value of the error cost function depends on both the underlying uncertainty in their true values and on which observations are selected for error cost minimisation. Further details of the specification of the error cost function are given in Annex 1 and in Section 4 below.
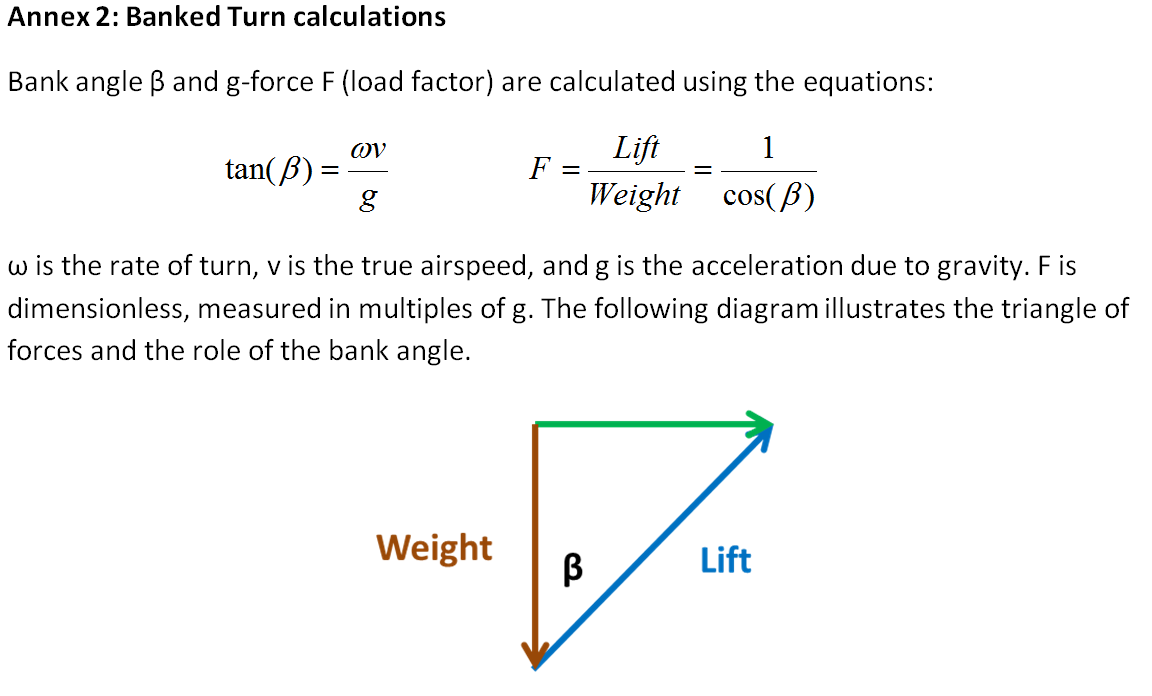
For the scenarios reported here, the start azimuth was assumed to be at the N571 alignment of 296 degrees (measured through east from true north). To conform to limits of lateral navigation, all turns were constrained to be within a bank angle that did not exceed approximately 25 degrees. The corresponding g force experienced would therefore not exceed 10% above normal gravity. The equations used for the banked turn calculations are given in Annex 2. The FMT was constrained to terminate by 18:40 and to be executed within a period of just over two minutes.
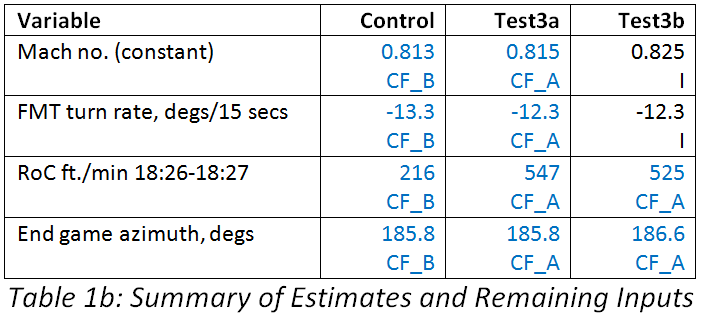
Each scenario used a different approach to select which of the unknowns were estimated, and which observations were used to estimate them. In Table 1b, CM_A and CM_B refer to different subsets of observations employed for cost minimisation, as detailed in Table 2.
It can be noted that the estimated Mach numbers were similar in the Control scenario and Test 3a. For Test 3b a slightly higher value was input, to produce an offset which continues into the end-game (i.e. post-FMT). The estimated climb rates (RoC) were moderate but varied between scenarios, giving increases in altitude of over 500 feet for Tests 3a and 3b, but of less than 220 feet for the Control scenario.
The proximity (minimum distance) from the nominal IG September 2014 location were all computed assuming an altitude of zero (i.e. assuming that the 7th ping ring is located close to, or at, sea level; see this recent post). However, the waypoint and offset distances were calculated by finding the minimum distances of the offset paths from a reference location on the Control path, at a common altitude of 35,000 feet.
3. Three Scenarios, a Suggested Interpretation and a Disclaimer
The selection of the three scenarios presented arose from a suggestion made by Sid Bennett, who set out clearly how they might be expected to operate. His contribution is gratefully acknowledged. Their suggested interpretation arises from discussions with Barry Martin, who created the program being used for flight path analysis and whose contribution is also gratefully acknowledged. Any errors or misunderstanding in this report are entirely my own. Two short extracts from Sid’s proposals are given in italics below.
The Control scenario represents a flight path with no offset. Its statistical support requires setting aside the 175 Hz BFO observation at 18:27. This type of scenario may have been implicit when the IG presented its September 2014 report.
Test 3a assumes that the 18:27 BFO observation is valid and results in an offset path, commencing shortly after the NILAM waypoint. This is an example of the type of scenario which was examined in [2] and in recent discussions within the IG. It transpires that, under the specified modelling assumptions for this test, the calculated path offset was not maintained after the IGOGU waypoint (i.e. there was ‘offset cancellation’). It seems that such a scenario is unlikely to be a result of the automatic operation of the flight management system (FMS), which would require the final major turn to exceed 135 degrees. Instead it would appear to require active human intervention near IGOGU:
“… the pilot cancels the offset either sometime before IGOGU or sometime after IGOGU, but before ISBIX. In the end, both options result in the plane flying the radial between IGOGU and ISBIX…” (Sid Bennett)
This may be contrasted with Test 3b, a path for which the path offset is maintained beyond the FMT:
“… After continuing the offset track south of IGOGU, the track continues parallel to the radial joining IGOGU and ISBIX as a geodesic until abreast of ISBIX and then continues as a lox [loxodrome] without changing the azimuth…” (Sid Bennett)
This scenario could, in theory, have been flown by the FMS, so it would not have required human intervention.
The formulation of these alternatives is particularly interesting. Assuming that they characterise the possibilities we might proceed by a process of elimination. First, if we were convinced that an offset had occurred, this would eliminate the Control scenario. The initial offset would have required active human intervention at about 18:27. If it were impossible in practice for the satellite data to discriminate between offset continuation and offset cancellation, it would then be difficult to determine if human intervention had or had not continued. Alternatively if one or other of the offset scenarios (Test 3a, Test 3b) could be eliminated then this ambiguity would be resolved. The following interpretations of the scenarios are proposed:

We will assess the comparative weight of evidence in favour of each of these cases.
4. Specification of the Cost Functions in terms of their constituent observations
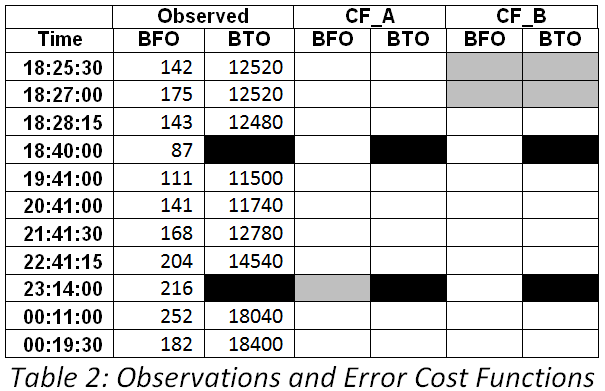
Table 2 reports the BFO and BTO observations which were used in each of the error cost functions. The grey cells indicate observations which were excluded from individual cost functions. The black cells show where no BTO observations were available.
For CF_A the BFO observation at 23:14:00 was excluded. This cost function was used to estimate unknowns in Tests 3a and 3b. For CF_B the observations (both BFO and BTO) at 18:25:30 and at 18:27:00 were excluded. This was used for the estimation of unknowns in the control scenario. The program automatically excludes all observations which occurred prior to the common start time of the scenarios of 18:22:15.
5. The Appearances of the Flight Paths for the Three Scenarios
Figure 1 shows the three flight paths over the full simulation period. At this resolution two paths (the red path is for the Control scenario, and blue path for Test3a) appear indistinguishable. They both pass within 20 nautical miles (NM) to the east of the nominal IG September 2014 location (37.5S, 89.2E; shown by the red X marker on the 7th ping ring). The dashed green Test 3b path passes within 20 NM to the west of the nominal IG September 2014 location.
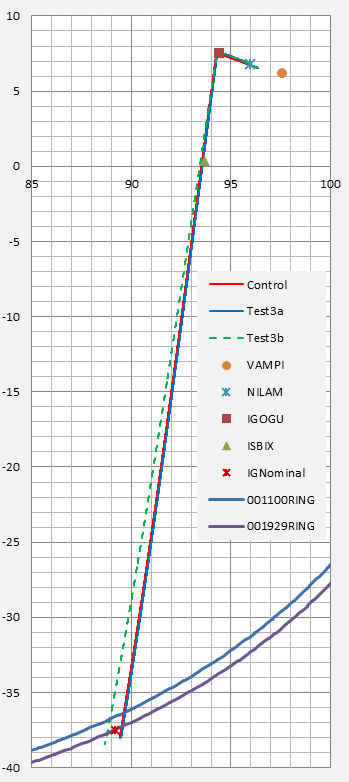
Figure 1: The Three Flightpaths in relation to the
Nominal IG September 2014 location
Figure 2 shows the paths in the vicinity of the ISBIX waypoint. The closest proximity between the Test 3a path and ISBIX is 4 NM, while the closest proximity of the Test 3b path to ISBIX is 12 NM, a difference of 8 NM.
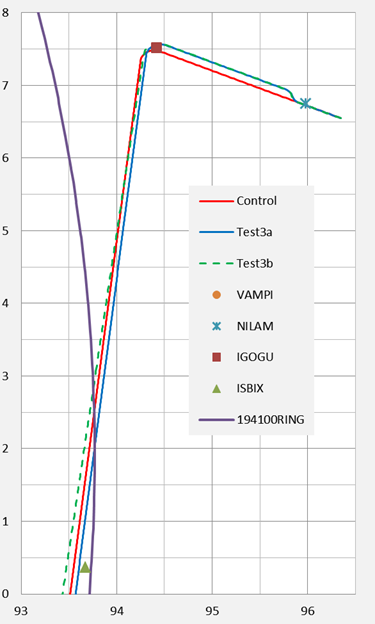
Figure 2: The Three Flightpaths in relation to the ISBIX waypoint
If we refer back to Table 1a we may note that the middle-game offset distance for both of these paths is between 6 and 7 NM. The difference of 8 NM distance from ISBIX is therefore sufficient to discriminate between a flightpath for which the offset is cancelled and one for which it is maintained.
The intersection of the Test3b path and the Control path, at a latitude near 5.7 degrees north, is also apparent in Figure 2.
In Figure 3, the red Control path exhibits no offset. Test 3a and 3b (dashed) have offsets starting near the NILAM waypoint, at distances of slightly over 6 NM from the Control path.
The early end-game path for the Control scenario commences to the west of the Test 3a path. This is unsurprising because, during the late middle-game, the offset paths are longer than the Control path. The Control path has the same speed as Test 3a, so it can proceed further west in the same elapsed time as the Test 3a path. The same check could not be used to compare the Control path with Test 3b, as the latter has a slightly higher speed.
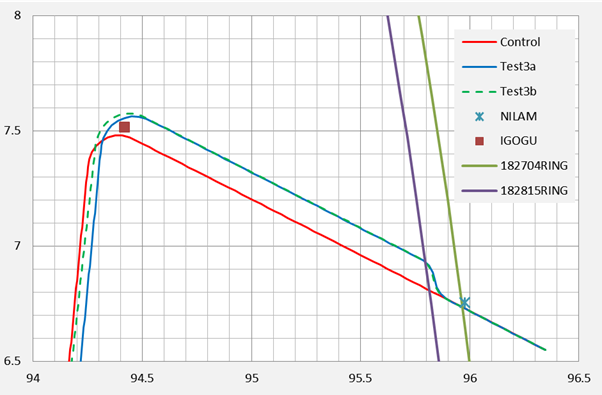
Figure 3: The Three Flight Paths in relation to
NILAM, IGOGU and the Final Major Turn
6. Error Analysis
Table 3 shows the BFO and BTO errors for each of the three scenarios. Values in excess of three standard deviations have been highlighted in yellow. Two of these errors apply to all three scenarios: the BFO errors at 18:25:30 and 23:14:00. At 23:14 similar errors have been noted for examined previously scenarios [2] and these could be either intrinsic to the observations, or due to unknown factors which have not been accommodated in any of the modelled scenarios. Previous simulations support the view that the 18:25:30 errors are correlated with the value of the middle-game azimuth.
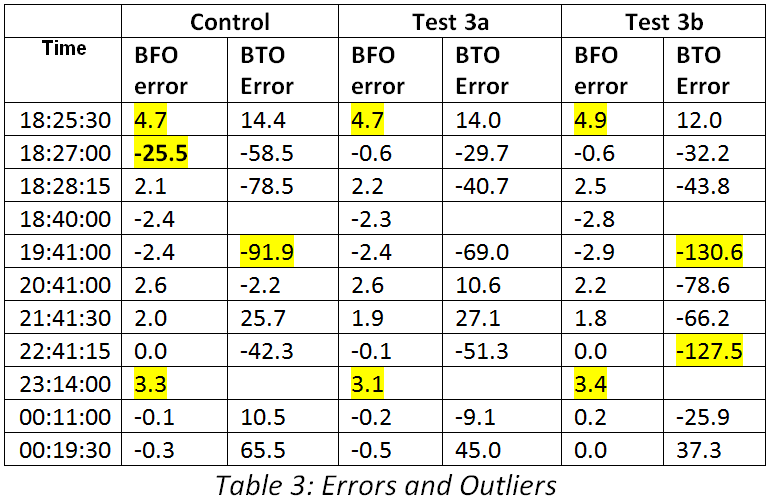
Next we look at those errors which help us discriminate between the current scenarios (Control, Test 3a, Test 3b). By far the largest error is for the BFO observation of 175 Hz at 18:27 when compared with the Control scenario. The best available explanation that we currently have for this is that an offset turn had occurred. This error is not present in the other two scenarios. Comparing Test 3a with Test 3b we note that the latter has two large BTO errors: at 19:41 and 22:41:15. For Test 3a, while errors are also present at these times they are of a much smaller magnitude. A broader statistical assessment is of interest.
Table 4 below reports the values of the error cost functions and their BFO and BTO constituents.
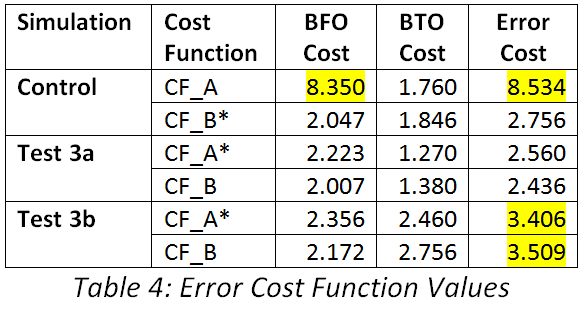
The second column in Table 4 indicates the cost function being reported, with an asterisk (*) being used to indicate which of them was used to estimate the unknowns. Test 3a performed best for both cost functions, and also for their BFO and BTO components.
The worst values are highlighted in yellow. The Control scenario performed the worst for CF_A, while Test 3b performed the worst for CF_B.
Pairs of scenarios can be compared by treating the error costs as standard normal deviates and calculating odds ratios. On this basis under cost function A (CF_A), Test 3a would have ten times higher a likelihood than Test 3b; and under cost function B (CF_B), Test 3a would have twenty times the likelihood. From either view, it would be reasonable to reject Test 3b (the continuing offset scenario). It remains a challenge to construct continuing offset scenarios which achieve substantially better performance with respect to the same observations.
The comparative odds for each of the test paths (3a, 3b) can also be compared with the Control scenario. Clearly under CF_A the Control scenario would be very strongly rejected, so it suffices to restrict attention to CF_B. On this basis the offset cancellation scenario (Test 3a) is only twice as likely as the Control scenario. Therefore, if the null hypothesis was the Control (no offset) scenario, it could not be rejected with a high degree of confidence.
We appear to be faced with a realistic choice only between either the no offset scenario (the Control scenario) or the offset cancellation scenario (Test 3a). Which of them is correct depends on the validity of the observations near 18:27 UTC. If they are considered valid then we have eliminated everything but the offset cancellation scenario.
7. Implications of Findings for Likely Scenarios and Human versus System Factors
In discussing the full set of findings we needed to discuss alternative stances with respect to the satellite observations at 18:27 (cf. the apparently-large BFO at that time). First, we will adopt a sceptical view and exclude them from consideration. A scenario without an offset is simpler as it has fewer degrees of freedom. An application of Occam’s razor would thereby make the no offset (Control) scenario the null hypothesis. On the sceptical view, this could not be rejected with a reasonable degree of confidence and the case for an offset would be weak, even though it appears as a slightly more likely alternative. Without an offset no human intervention would be implied during the late middle-game, and again this would seem to be a simpler interpretation of events. However its simplicity also makes it easier to falsify.
Next, we include the 18:27 observations, accepting them as valid. The case for an offset now becomes extremely strong and the issue is primarily whether or not it was cancelled. The scenarios presented here support the view that offset cancellation is the more likely scenario. The implication would be that human intervention had probably occurred, and that it had continued at least until the vicinity of IGOGU.
Conclusions concerning the continuation of human intervention beyond ISBIX, until the final descent, are outside the scope of this report.
References
[1] Bennett S. and Hyman G. Further Studies on the Path of MH370: Turn Time and Final Azimuth. MH370 Independent Group, March 2015.
[2] Hyman G., Middle game uncertainties in azimuth, with implications for the MH370 endpoint. MH370 Independent Group, April/May 2015.
[3] Exner M., Godfrey R. and Bennett S. The Timing of the MH370 Final Major Turn. Independent Group, March 2015.
[4] Steel D., MH370 Search Area Recommendation. MH370 Independent Group, September 2014
[5] Anderson B. The Last 15 minutes of Flight of MH370. MH370 Independent Group, April 2015.